📐Trend%Scale
Overview
Builds a directional trend skeleton by anchoring 0% → 100% between two price extremes found before your candlestick pattern:
- The scale anchors are derived from highest/lowest points located within a scan window (e.g., MaxDepth / RangeBars).
- You can then optionally enforce a Trend%Scale Size using %Change, Tick, or Price to stretch that trend (min/max amplitude).
- This scale serves both as a pre-trend filter and as a connection rail for candlesticks OHLC price levels and stop-loss price level.
Trend Structure Mode
Defines how the 100% level anchor is positioned relative to your desired pattern structure, Works together with Trend Direction.
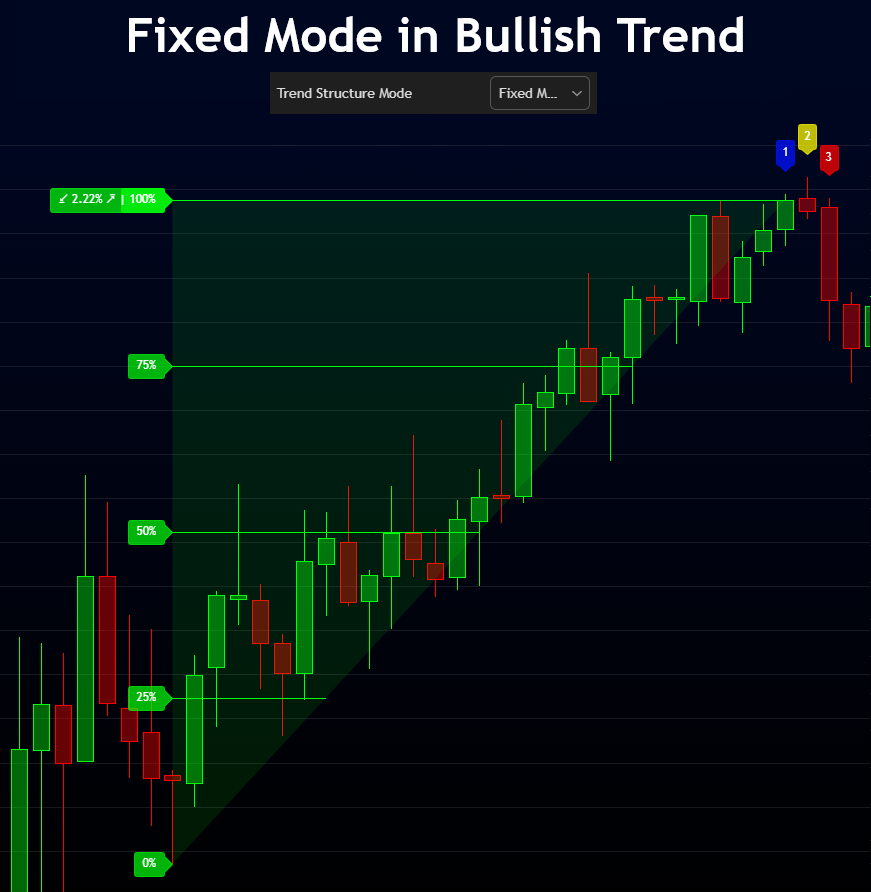
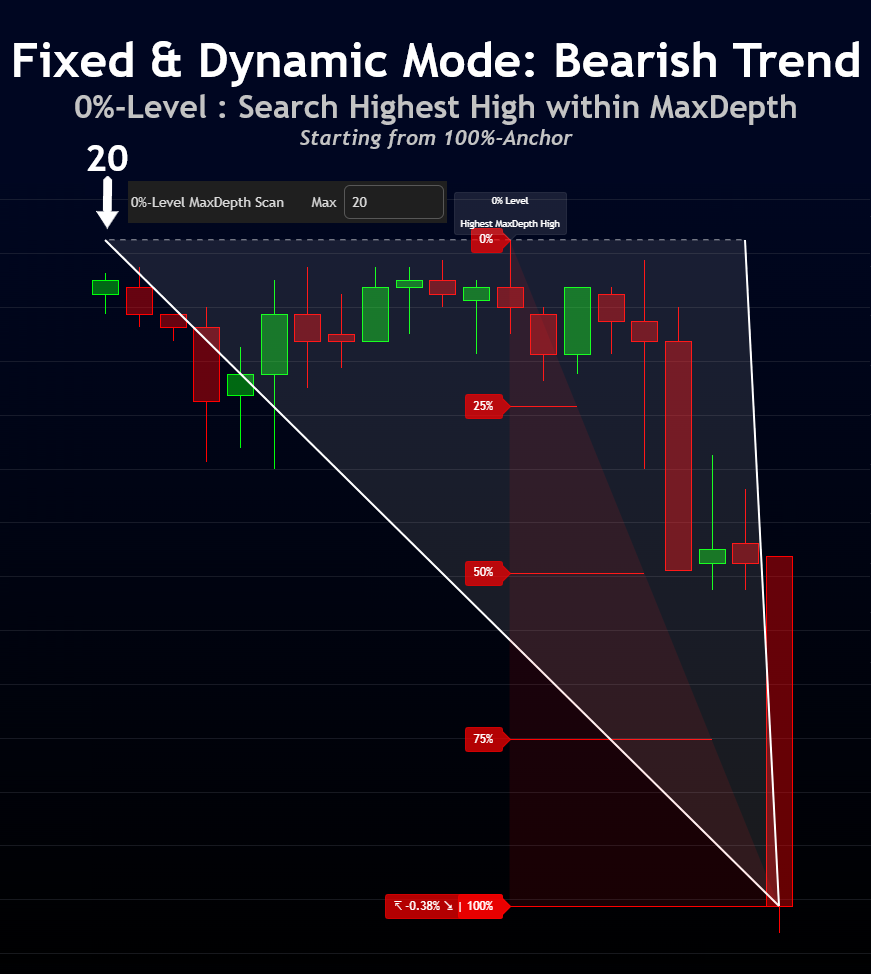
Fixed Mode
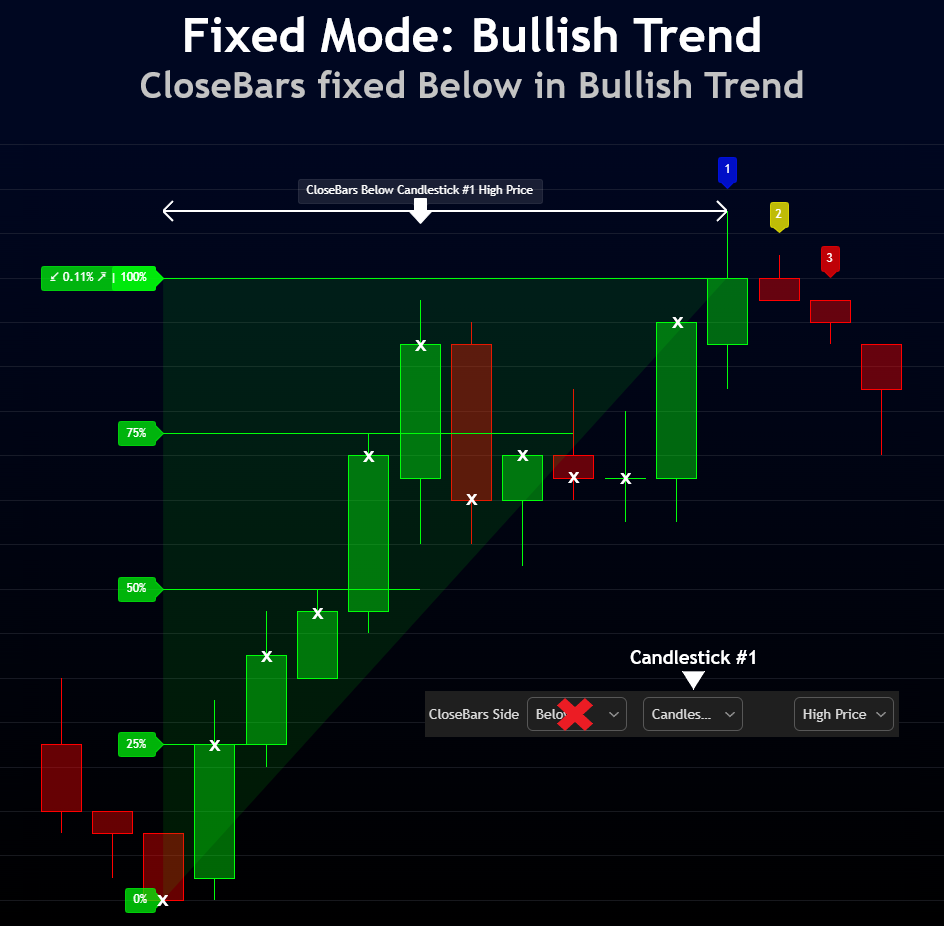
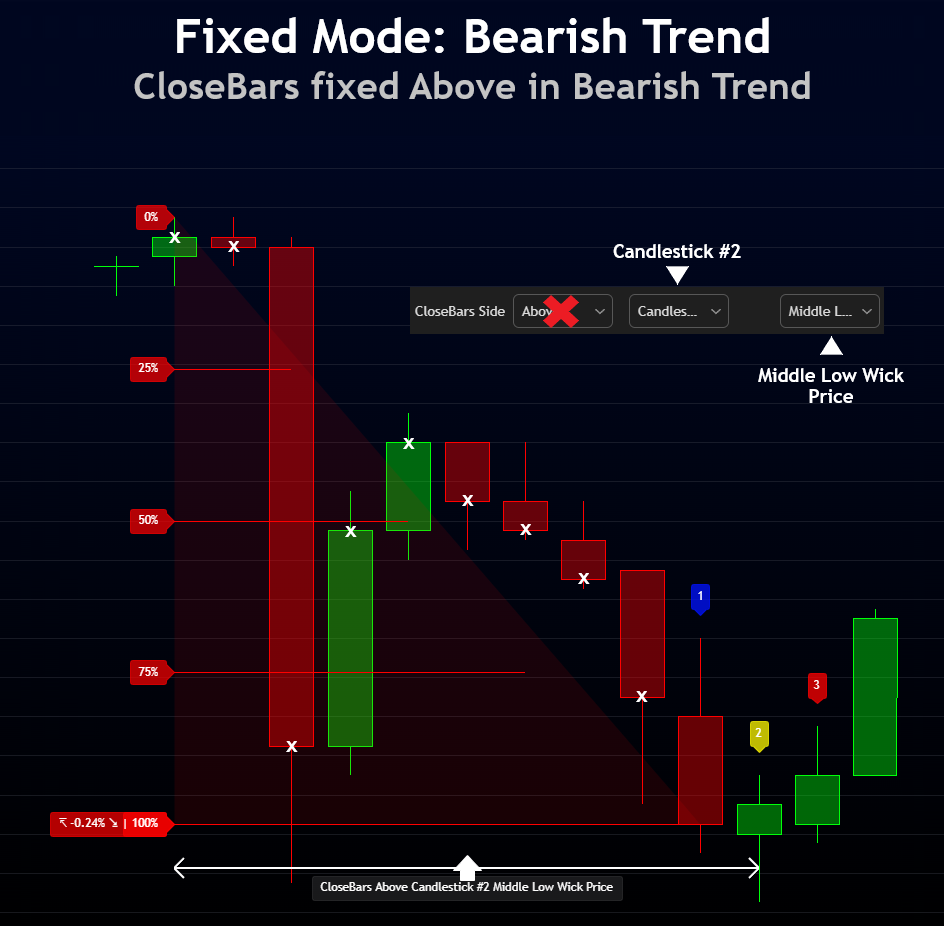
In Fixed Mode, the 100% level is anchored to Candlestick #1 of your pattern. This mode is great for building classic candlestick patterns strategies.
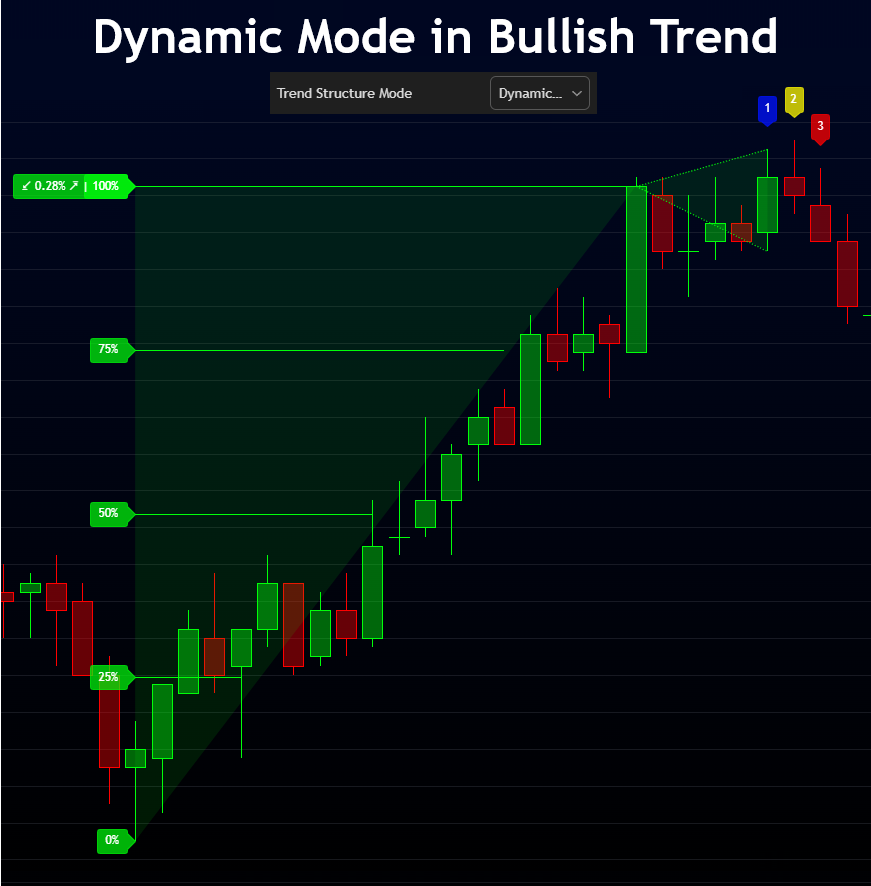
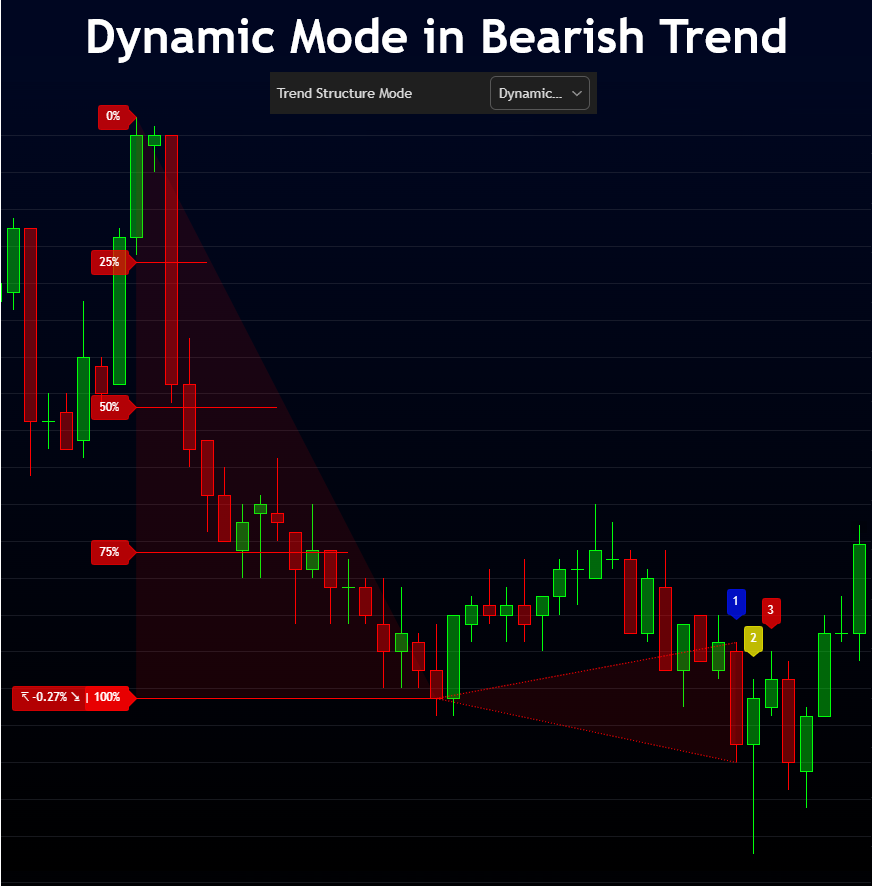
Dynamic Mode
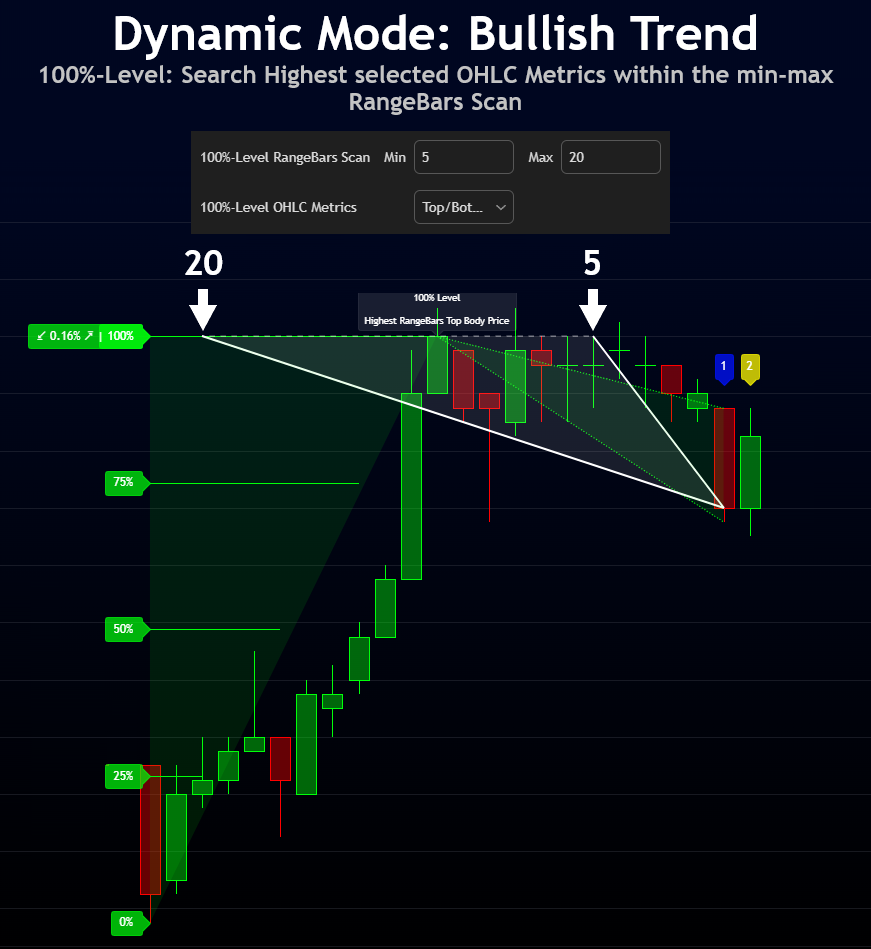
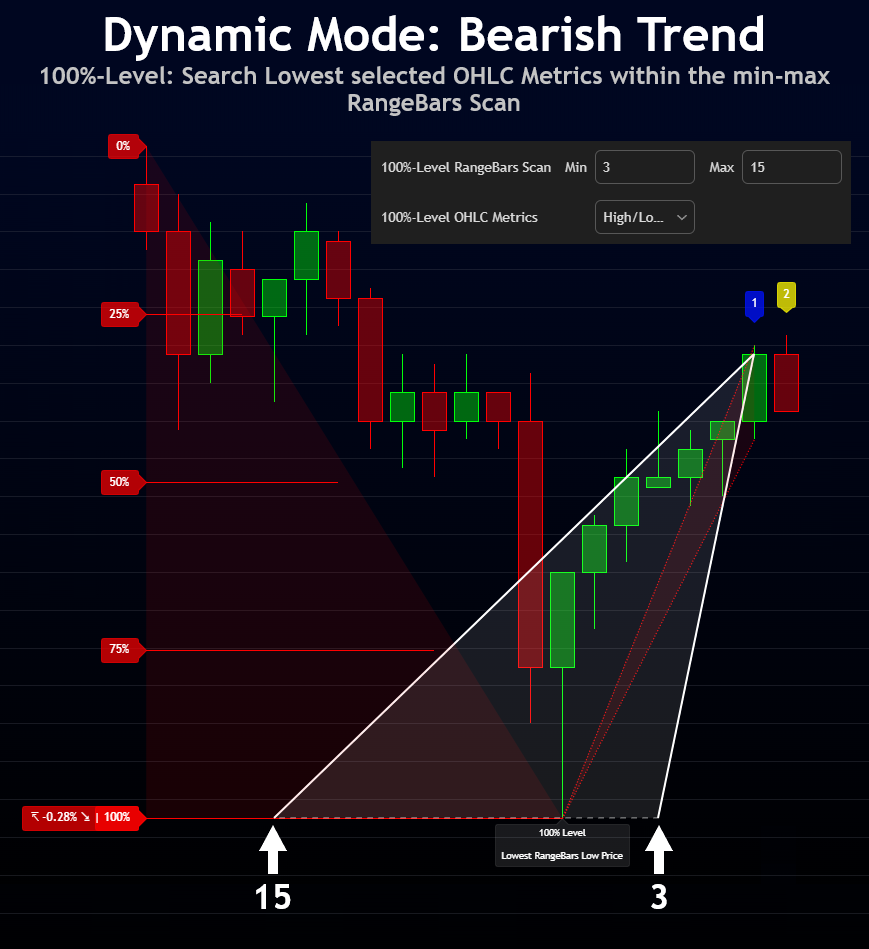
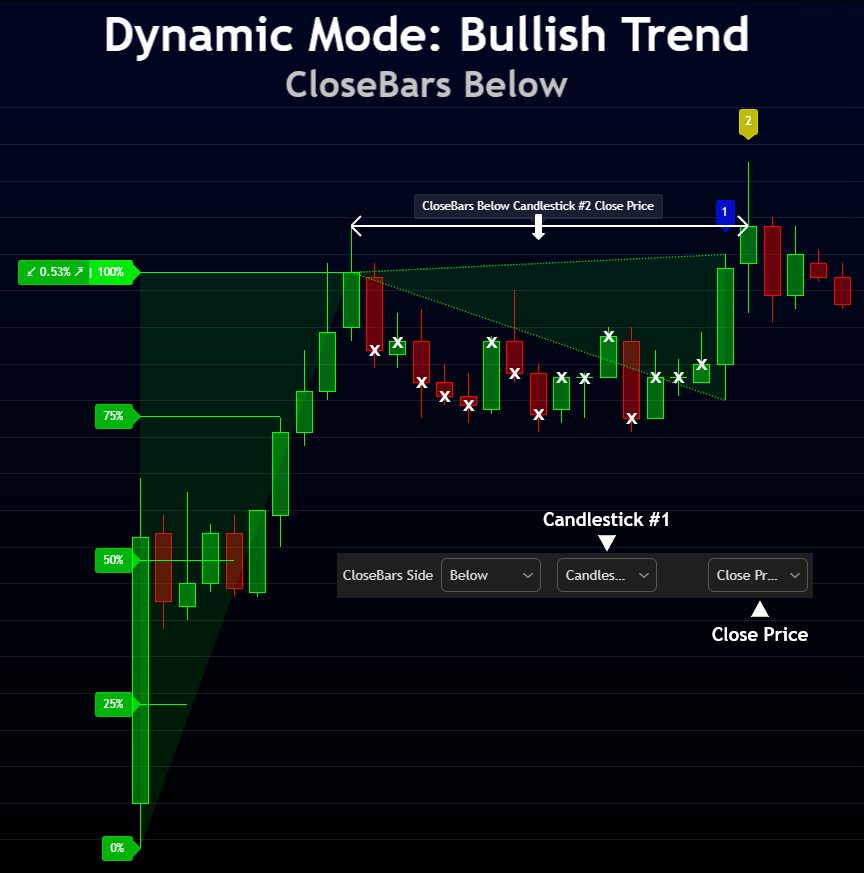
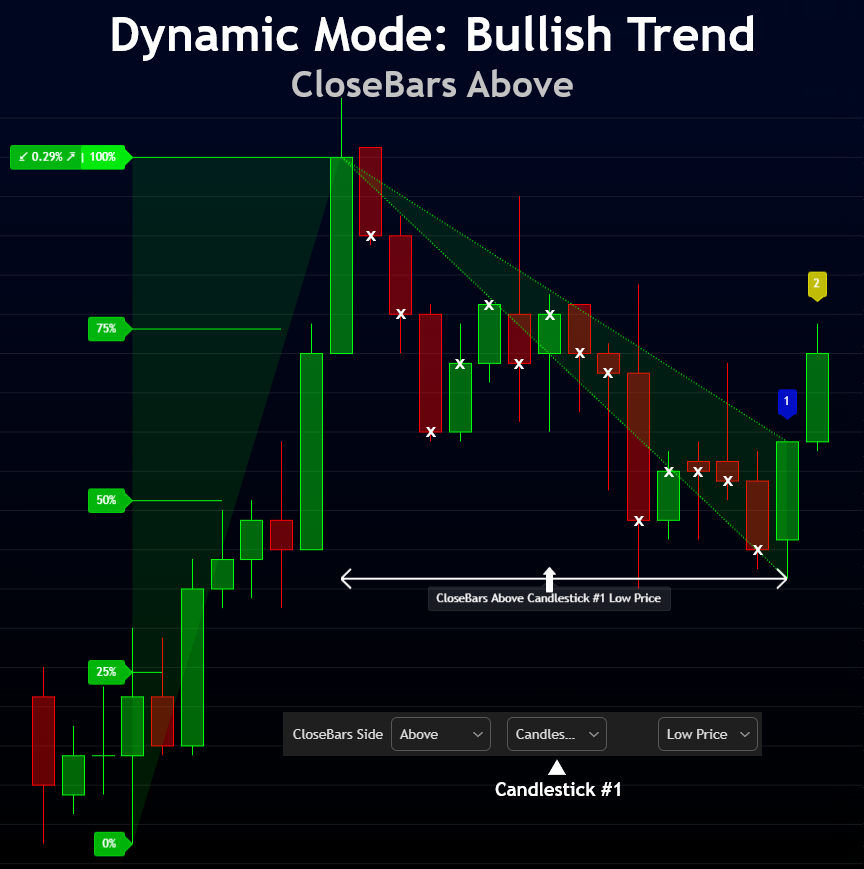
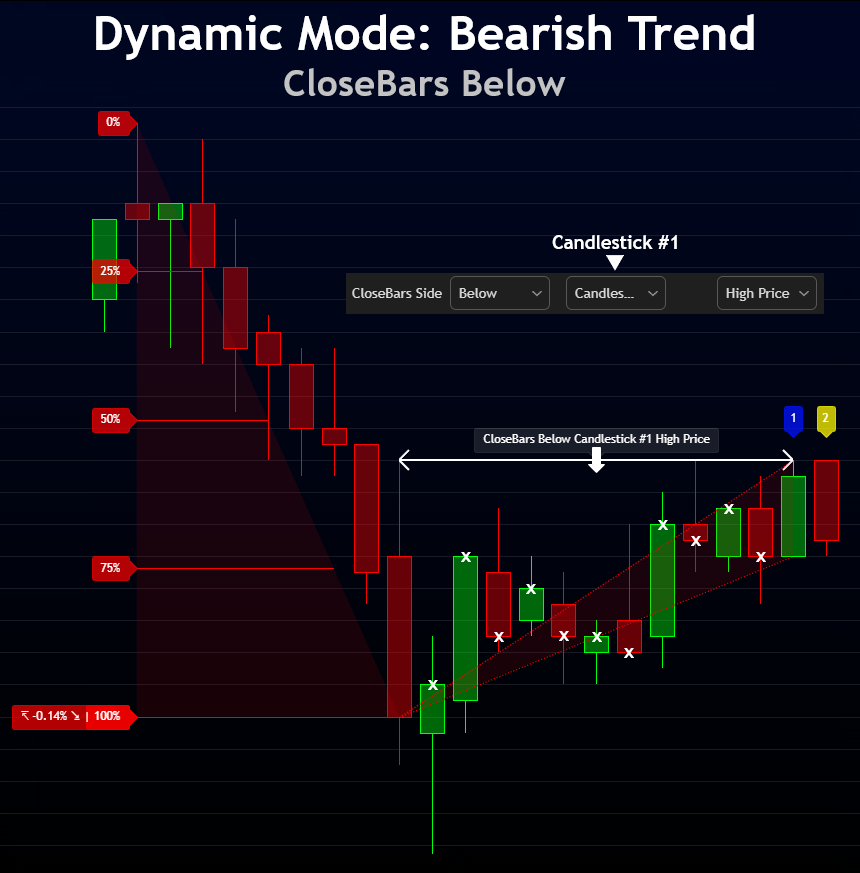
For Dynamic Mode, The 100% level is independent from Candlestick #1 and is auto-located within a scan window before your pattern. This mode is optimized for building advanced chart patterns like breakouts, pullbacks, and reversals setups.
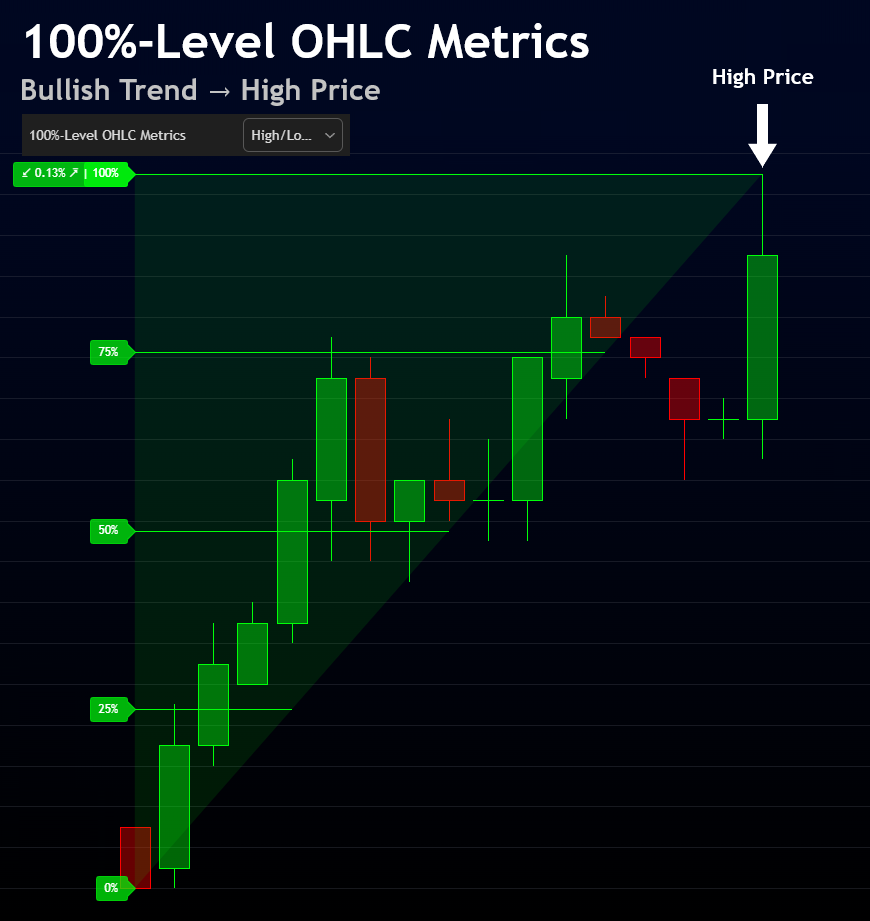
- Bullish Trend = The 100%-Level is set to the Highest selected OHLC based on the "100%-Level Metrics" setting within the “100%-Level RangeBars Scan” window.
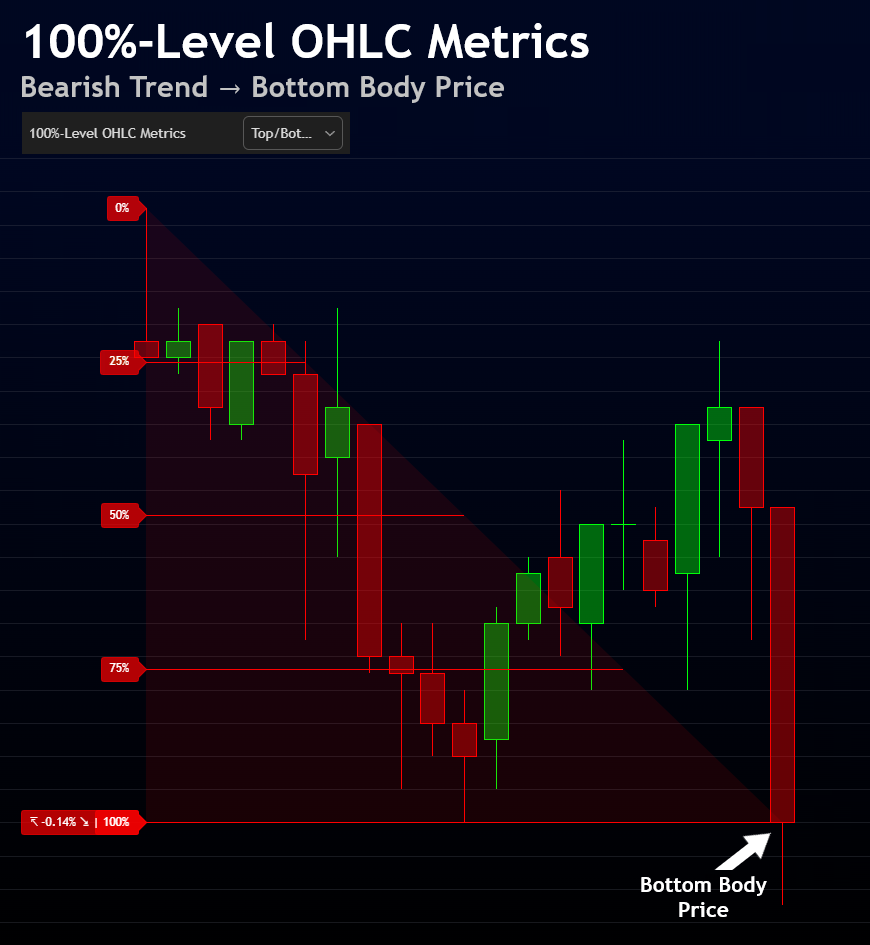
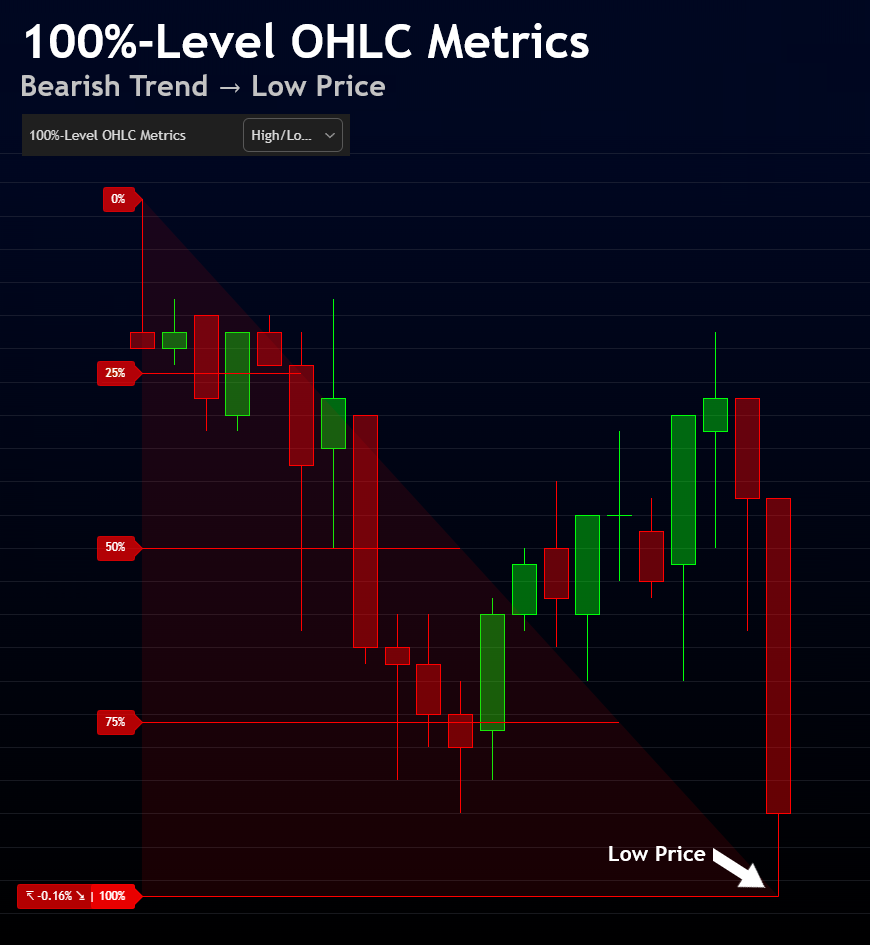
- Bearish Trend = The 100%-Level is set to the Lowest selected OHLC based on the "100%-Level Metrics" setting within the “100%-Level RangeBars Scan” window.
In Dynamic Mode, you control where 100% can be found using 100%-Level RangeBars Scan (Min/Max). In Fixed Mode, 100% is simply Candlestick #1.
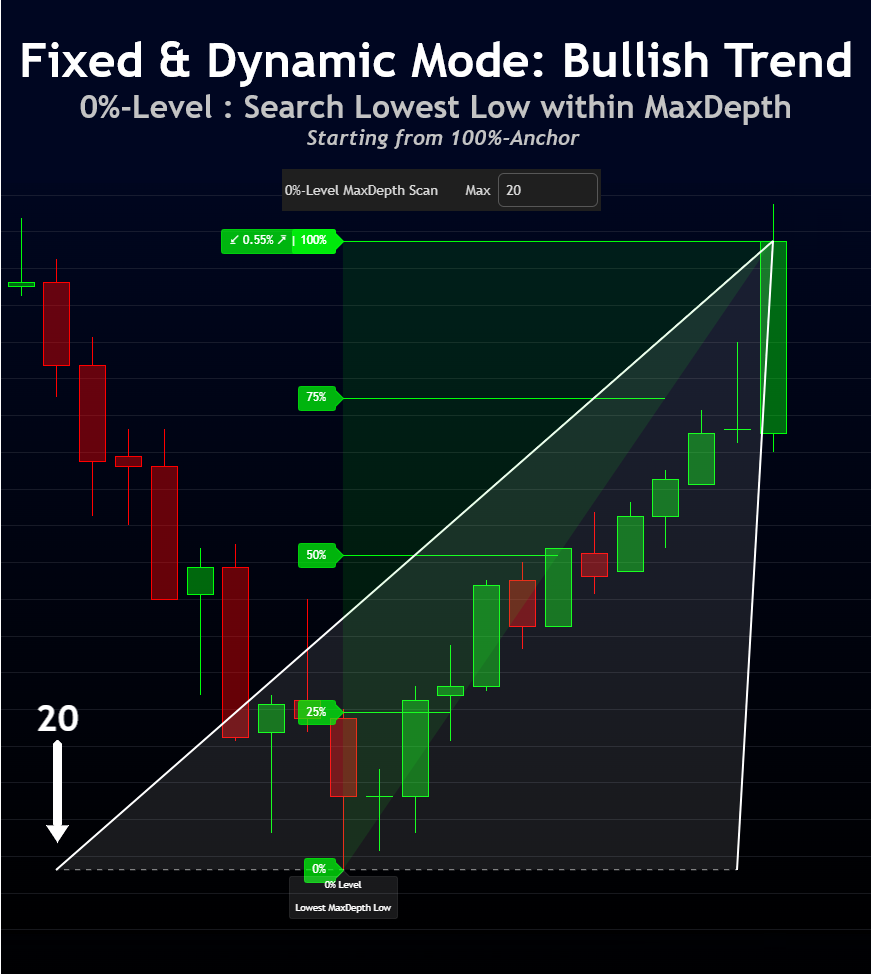
0%-Level MaxDepth Scan
Defines how far back you search to place the 0% anchor (works the same in Fixed and Dynamic modes).
- Bullish Trend → 0% = Lowest Low found within the MaxDepth range before 100% anchor.
- Bearish Trend → 0% = Highest High found within the MaxDepth range before 100% anchor.
MaxDepth sets the maximum backward reach for 0%. It always scans before the 100% anchor.
100%-Level RangeBars Scan
Sets the min–max window (in bars) used to locate the 100% anchor before Candlestick #1 (Works only for Dynamic Mode).
- Bullish Trend = The 100%-Level is set to the Highest selected OHLC based on the "100%-Level Metrics" setting within the “100%-Level RangeBars Scan” window.
- Bearish Trend = The 100%-Level is set to the Lowest selected OHLC based on the "100%-Level Metrics" setting within the “100%-Level RangeBars Scan” window.
This setting is ignored in Fixed Mode because 100% anchor is the Candlestick #1.
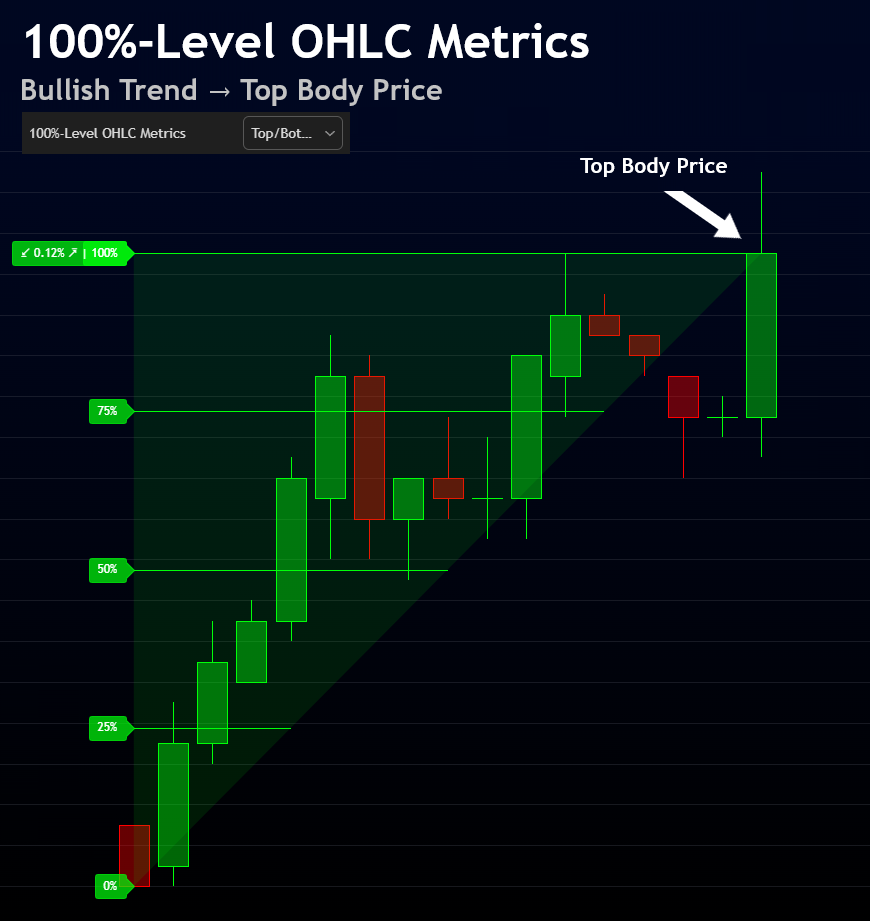
100%-Level OHLC Metrics
This setting lets you choose which OHLC level you want for your 100%-anchor of your Trend%Scale (Works on Fixed and Dynamic Mode).
Bullish Trend
- Top/Bottom Body Price → The 100%-Level is set to the Top Body Price.
- High/Low Price → The 100%-Level is set to the High Price.
Bearish Trend
- Top/Bottom Body Price → The 100%-Level is set to the Bottom Body Price.
- High/Low Price → The 100%-Level is set to the Low Price.
Once anchored, you can:
- set the Size in %Change, Tick, or Price between these two anchors (0-100%).
- connect OHLC levels from Candles #1–#4 to the Trend%Scale.
- connect your Alert level to the Trend%Scale.
About Top/Bottom Body Price:
Top Body Price = The highest candlestick Open/Close (Close price if the candlestick is Bullish, Open price if the candlestick is Bearish).
Bottom Body Price = The lowest candlestick Open/Close (Open price if the candlestick is Bullish, Close price if the candlestick is Bearish).
Trend%Scale Size
Sets a minimum/maximum size requirement between 0% and 100% to stretch the trend.
- Metrics: %Change, Tick, or Price.
Define a Size for Trend%Scale to avoid detecting false or tiny trends and ensures to strech the trend. This keeps your pre-trend strong and consistent with your strategy’s intent.
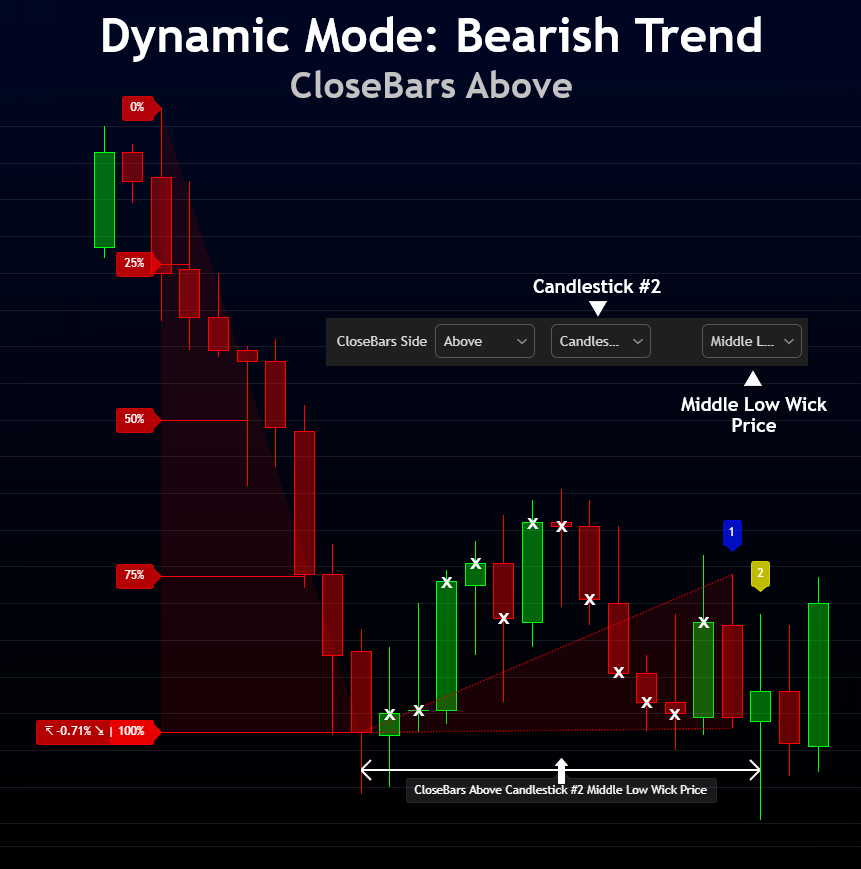
CloseBars Side
Controls how bar closes between the anchors and your pattern must behave relative to a reference OHLC level you choose.
- Reference Limit Level: pick the candle (Candlestick #1/#2/#3/#4) and the price (Open/High/Low/Close/Top Body/Bottom Body/Middle …) for reference limit level.
- Above / Below / None: choose the required side relative to that reference limit level (only on Dynamic Mode).
For Reference Limit Level, it's useful to know that Tiny gaps often exist between a candle’s Close and the next candle’s Open. For more robust checks, use Middle Body Price, Middle Low Wick Price, or Middle High Wick Price as your reference to let some space for the Close bar before the Candlestick #1.
Fixed Mode
- Bullish Trend → Close bars between the 0% level and Candlestick #1 must stay below the chosen candlestick OHLC limit level (Above/Below/None dropdown is ignored — positions are fixed by Trend Direction).
- Bearish Trend → Close bars between the 0% level and Candlestick #1 must stay above the chosen candlestick OHLC limit level (Above/Below/None dropdown is ignored — positions are fixed by Trend Direction).
Dynamic Mode
- Bullish Trend → Close bars between the 100% level and Candlestick #1 can be forced Above or Below to the chosen candlestick OHLC limit level (None option disable CloseBars settings).
- Bearish Trend → Same as bullish trend logic (None option disable CloseBars settings).
